Macro Generator
monika — 2021-02-25T08:19:11-05:00 — #1
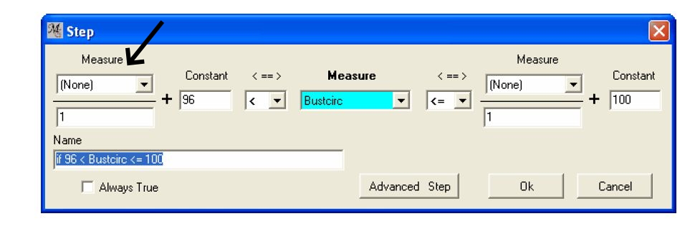
Hi does anybody know why one cannot use the first part of this field . See following screenshot of the Step in Question. Black arrow shows to the field which is not filled out -> they begin with the measurement in the middle
I copied-pasted the explanation text here:
And this is the explanation, which I dont understand - perhaps someone can explain
And second question:
"TRUE": does the explanation mean that no conditions are necessary and no conditions are used if I check TRUE? When TRUE is checked the THEN-STEPS are executed without checking the conditions? But for what reasons one uses this then?
eugenienaber — 2021-02-26T06:20:59-05:00 — #2
You can use also the first measure field to fill in. But to give the user an idea how to fill in this formula we have made the middle Measure field blue. You start first with a Measure you want to set an If (condition) on. In your case the Bustcirc. And then you start to fill in what it should be : bigger or smaller as a value and/or measure or in between 2 values and/or measures.
When you start in the middle you can do all 3 possibilities. When You start at the left you can never do in between 2 values or a Measure is > < as a value..
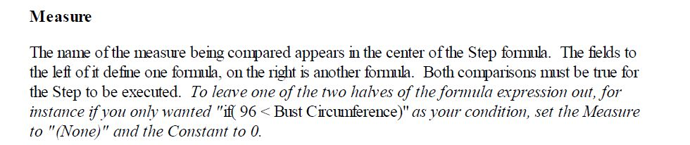
I made a picture of using the left field.
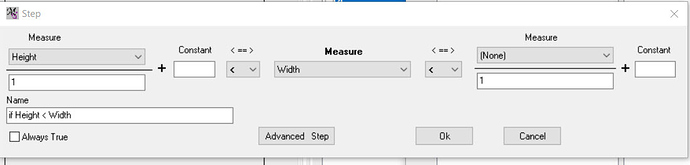
TRUE
when you check at the Always True box you make a result that is always happening. There is no condition, the result is always happening. Think about an Ease style where the user can select if he wants 8, 10 or 12 cm Ease in his pattern.
In the Piece Ease you have 3 styles 8, 10 12 cm ease.
With the Always True condition you can define how much ease is being used in each style.
Select the parent Style Ease and go to Point/Logic. Check the Always True box and true appears in the name field. I would change true into true Eas to give me information what this true is about Click OK..
Select the True ease If on the left side and click at add a result:
I have made in advance a math. measure Brustcirc.+ = Brustcirc. + 0 ( the + I always add when I add ease to a measure)
I select the Measure Brustcirc.+ and change it into = Brustcirc.+ 8. ( the parent is equal to style 8 cm ease). Click Ok and leave the logic.
The style 8 cm is equal to the parent so does not need to be changed.
Select the style 10 cm and select Point/logic.
The Use parent box in True ease is checked, this means the settings of the parent are being used. . Uncheck it and now you can see the result at the right side. Now you can change the results.
Change it in Bustcirc + 10. Click Ok and change also in the same way the 12 cm style.
In this way you can change measures for each ease option, think about the body measures like waistcirc. hipcirc, shoulderwidth, sleevewidth, Backwidth you can set to the right ease in the pattern. You can add more results in one AlwaysTrue condition. So in the True ease condition you can set all the measures which have to do with the ease style.
Eugenie
monika — 2021-02-26T07:10:57-05:00 — #3
Ok then it is only used for sold macros no? For me I even could take a prompted measurement for ease and type in the number I want when the macro runs right?
eugenienaber — 2021-02-26T08:10:17-05:00 — #4
No not only for sold macros. Also for own use.
You could make a prompted meas which you fill in every time.
But not all measurements do get the same ease when the brustcirc. is having more ease and then you have to make more prompted meas for each meas one.
Everything I can get automated and programmed is easier when using it.
When you would make a blouse macro you could use that blouse in several eases depending on what kind of blouse you like and the fabric you use. Then I would make a ease piece with ease options where I define per measurement how much ease is needed in that style.
When you do it not like that, having to type it in for several prompted measurements would be much more work to do.
But it is up to you how you do it and like it.